30 Jan 2017
I won’t explain how to use carrierwave
and upload images to Rails here. Lets assume this part is ready and well understand.
Create Google API account
Whole process is not very easy nor obvious. I’ll explain what I remember without
telling all the details to let you grow some hate towards Google :)
-
You must create account. Keep in mind you
need to attach credit card to end signing process.
-
Create new project.
-
Generate and download JSON key file. The file you downloaded is base64
encoded JSON.
Funny that you must decode it by yourself and Google
doesn’t tell you about it, isn’t it?
cat instaupload-ad4695a0c2d0.txt | base64 --decode > instaupload-ad4695a0c2d0.json
Rails code
I found existing Ruby sample code
how to use Google gem.
-
Add official Google API gem.
-
I prefer to use service for that kind of operation, for example:
put code inside class in app/services/google_faces.rb.
-
Sign in into Google API:
vision = Google::Cloud::Vision.new(
  project: "instaupload",
  keyfile: "instaupload-ad4695a0c2d0.json"
 )
-
Upload image to Google API:
# photo is an instance of Photo model which has attached `image` as `carrierwave` `ImageUploader`
image = vision.image photo.image.path
faces = image.faces
-
Wait for results and iterate:
faces.each do |face|
Rails.logger.debug "Face bounds:"
face.bounds.face.each do |vector|
  Rails.logger.debug "(#{vector.x}, #{vector.y})"
end

x1 = face.bounds.face[0].x.to_i
y1 = face.bounds.face[0].y.to_i
x2 = face.bounds.face[2].x.to_i
y2 = face.bounds.face[2].y.to_i
07 Jan 2017
ImageMagick mass resize
I take a lot of photos and standard result is 20MP image file sizing 4-10MB.
It’s not big, but there are a lot of reasons you don’t want to throw original
size photos on the web.
As a GNU/Linux long time user I resolve my problems by creating scripts
and using already available tools.
I’ve created simple bash script to iterate by images, check if it wasn’t already
resized and resize them to .
mkdir small
for file in $(find . -iname '*.jpg'); do
  if [ -f small/${file} ];
  then
    echo "File small/${file} exists."
  else
    echo -n Converting ${file}...
    convert -resize 2048\> "$file" "small/$file"
    echo done
  fi

done
You can find more information about CLI processing,
resize and
geometry.
TODO: I need to fix resize size for vertical images.
Add watermark
Until today I rarely added any watermarks or information about author
into images.
After some big changes in my second blog I can put my photos as a file. I don’t
need to use external services like 500px or SmugMug.
I thought about property issues and content stealing.
There is problem and solution could by only similar - writing another script.
If you want to add watermark using ImageMagick you can do it using
composite -dissolve 50% -gravity south WATERMARK.png INPUT.jpg OUTPUT.jpg
Source: ImageMagick forum post
Mix resize and add watermark
You can pipe ImageMagick commands with miff:- as in example below
convert -resize 2048\> "INPUT_ORIGINAL_SIZE.jpg" miff:- | composite -quality 80 -dissolve 50% -gravity south WATERMARK.png miff:- OUTPUT_RESIZED.jpg
I assumed JPEG quality as 80.
Mass resize and add watermark
Mixing all above knowledge I’ve upgraded my resize script to add watermark.
mkdir small
for file in $(find . -iname '*.jpg'); do
  if [ -f small/${file} ];
  then
   echo "File small/${file} exists."
  else
    echo -n Converting ${file}...
    convert -resize 2048\> "$file" miff:- | composite -quality 80 -dissolve 50% -gravity south ~/Obrazy/watermark.png  miff:- "small/$file"
    echo done
  fi

done
It’s a bit slower now, keep that in mind.
Protip: You can keep watermak file in somewhere else and use absolute path.
31 Oct 2016
Case
I was installing Raspbian on microSD card and put wrong card into my laptop.
After flashing Raspbian on it I’ve found it was the card used by my parents compact
camera. I thought all data was lost.
Quite a few years ago I had my last attempt at recovering data from
failing HDD disk, and I was using the most popular commercian windows tool
(it was probably
Ontrack)
I’m using exclusively GNU/Linux on laptop now so I cannot use windows tools
so I need to do some research.
The best results I’ve got using foremost
which search image for JPEG begin and end file signatures.
Process
First we need to copy data from device with broken filesystem. This is dangerous
process if you mistake source with destination.
dd if=/dev/sdb of=sd.img bs=1MB
Next create directory where you want output JPEGs to be stored. I hope you don’t
need to readt how to create directory mkdir output.
The last part, apart of checking output, is to run recovering tool.
foremost -t jpeg -i sd.img -o output/
-t jpeg - it has predefined some types of files which can try to recover.
I haven’t tried other types.-i sd.img - image of whole device copied using dd-o output/ - recovered files with report will be put there
03 Mar 2016
Low hardware requirements
You can easily deploy it on Raspberry Pi or any
low-end computer. One of it instances works on Raspberry Pi B
with only 512MB of RAM.
There are some requirements your computer need to meet:
- it has run on GNU/Linux or *Nix
- it has to be connected to HomeIO hardware, for example: Arduino
Wind turbine instance utilizes only 15% of Raspberry Pi
CPU when not performing store/restore of a whole measreuments buffer.
Imagine that it gets 10 types of measurements, all every about 150ms and do lot of
processing.

Fast access to measurements
There is measurement buffer which store every fetched raw value of measurement.
Every one raw value is only unsigned int in already allocated std::vector. There is no time
information per value, rather it use interval. Small time inaccuracy is acceptable.
The memory usage is the most efficient as possible. Just plain raw values in RAM.
That means if you want to see a graph there is no IO operation.
Measurements are archivized in CSV file in format:
name; time_from_miliseconds; time_to_miliseconds; value_as_float
It will be easily processable in future, but in my experience you will
rarely want to do it.
“Everything in backend” philosophy
Everything what you need to set up is in the main file.
Just one file! Run it and frontend will fetch everything needed.
The only exceptions are:
- addons - which you can write own from scratch
- frontend password to execute actions - double hashed string using md5
Web frontend - just run it
Just run frontend application, setup your router and you can see what your
system is doing.
Just like backend, the frontend was also designed to be resource friendly.
Frontend acts like a proxy between web browser and backend. Everything
is generated in backend, and send as a JSON to web browser.
All processing to render graph is performed in client space.
Graphs are rendered using flot.
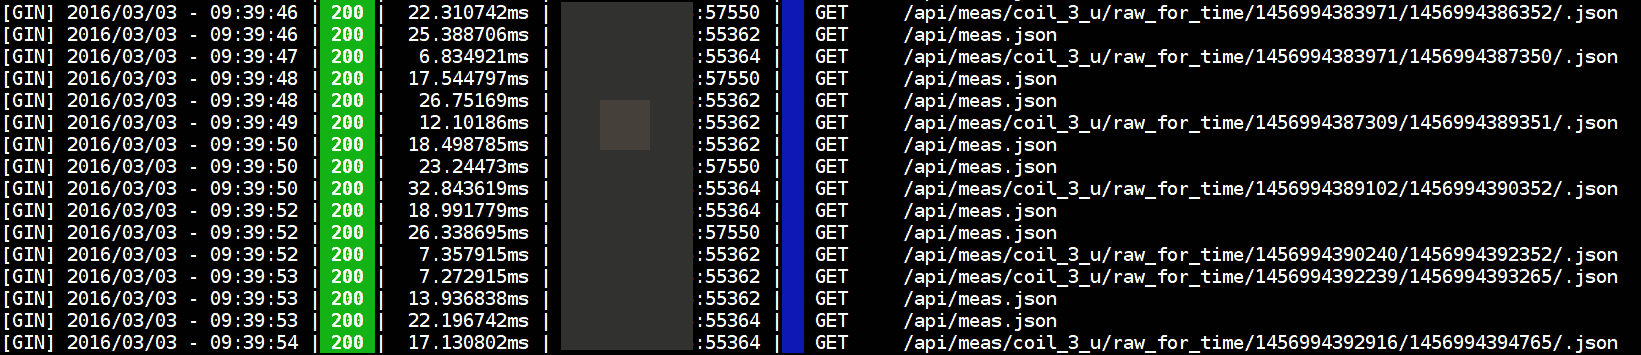
As you can see above theese requests needed to render graph were served in less than
50ms on Raspberry Pi B!
Keep in mind if our frontend is not what you need feel free to write your own.
NCurses console interface
If you not want to run frontend backend allow you to see what backend is doing,
you can use simple console interface.
It’s free - GPL licence
If you want and know how to feel free to use HomeIO for free.
14 Feb 2016
New tab
There were 3 types of objects: measurements, actions and overseers. Now I have
added addons!
At this moment you can see what your addons are doing by getting table like data.
Api response
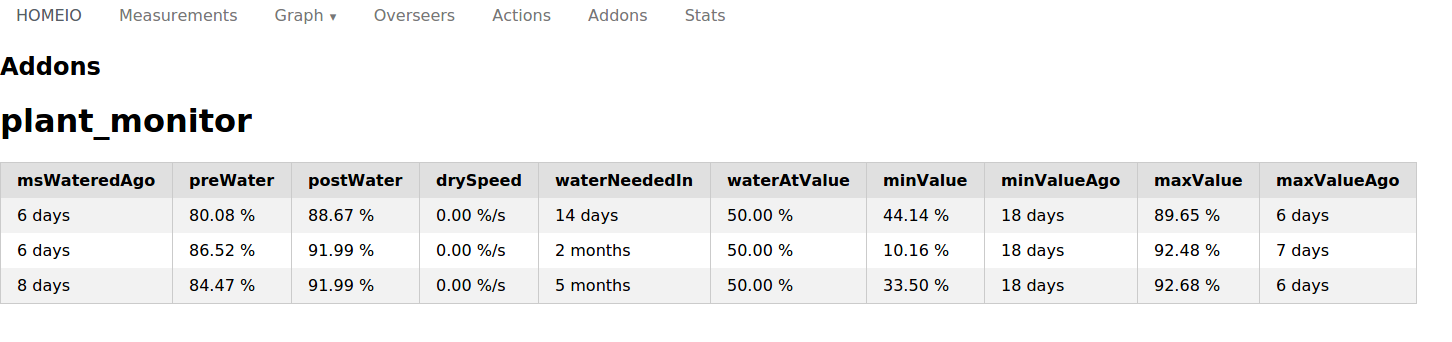
This is sample response of plant_monitor addon:
{
   "status":0,
   "object":{
      "array":[
         {
            "msWateredAgo":515720388,
            "preWater":80.078125,
            "postWater":88.671875,
            "drySpeed":0.000719,
            "waterNeededIn":1215002270,
            "waterAtValue":50.000000,
            "minValue":44.140625,
            "minValueAgo":1575903852,
            "maxValue":89.648438,
            "maxValueAgo":515705034
         }
      ],
      "name":"plant_monitor",
      "keys":[
         {
            "key":"msWateredAgo",
            "type":"interval"
         },
         {
            "key":"preWater",
            "type":"float",
            "unit":"%"
         }
      ]
   }
}
object - response of command
array - array of hashes: column key -> valuename - name of addonkeys - array of useful information how to render this data
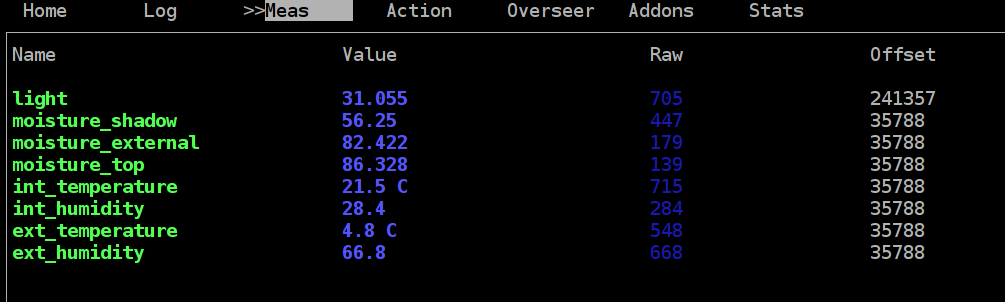
Sample image
Plant monitor
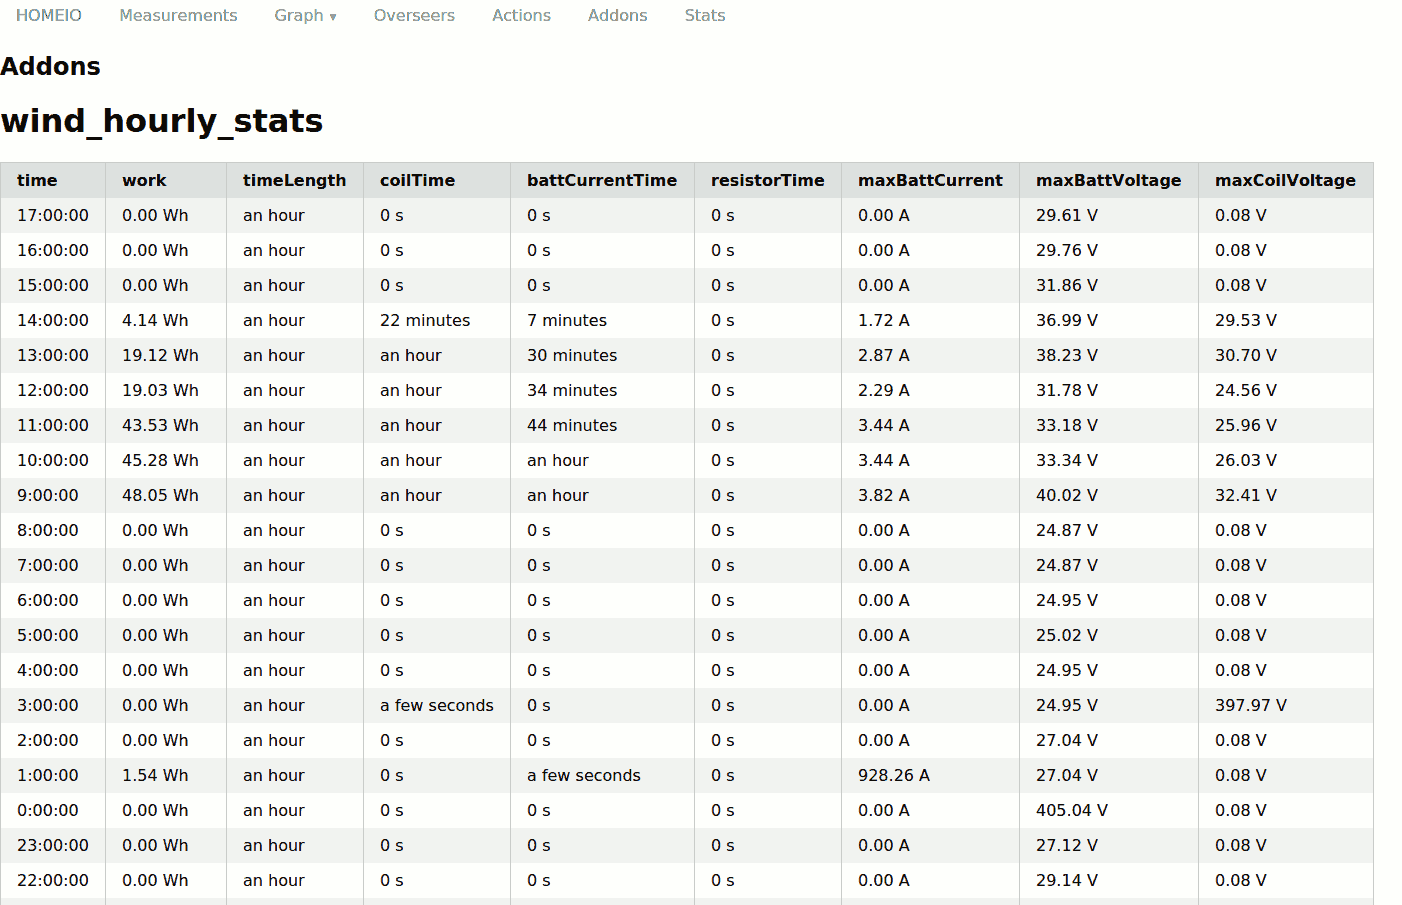
Wind turbine stats
End
More features coming soon. Feel free to ask for them.